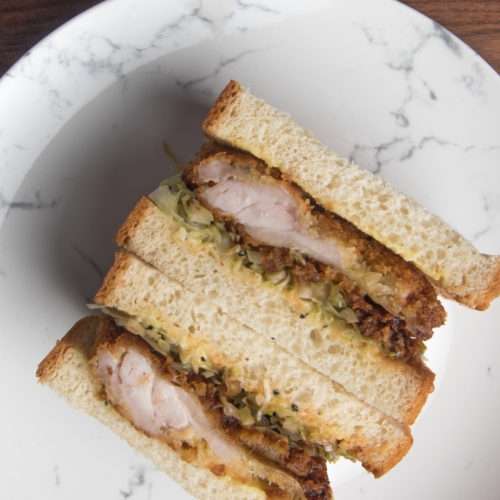
CHICKEN KATSU SANDWICH
The essence of what makes this sandwich great is the textural contrast between pillowy soft white bread and crunchy flavourful fried chicken. For the best possible texture, we’re going to bread the chicken using panko breadcrumbs and shallow fry it in a pan. For the best flavour, we’re using skin-on, boneless, chicken legs and not breasts. Legs have plenty of fat, which means plenty of flavour and moisture. Fried chicken sandwiches love some heat and for this recipe, I’ve opted for plenty of Shichimi Togarashi. This Japanese 7-spice blend is a combination of chili pepper, Orange peel, black sesame, white sesame, ginger, Japanese pepper, and seaweed. (Although different brands have some variation). This brings some heat but also some serious flavour.


INGREDIENTS
FOR THE CHICKEN
- 4 Chicken legs, deboned, skin on
- 200 g All-purpose flour
- 4 eggs
- 150 g Panko Breadcrumbs
- 200 ml Vegetable oil
- Salt
- Shichimi Togarashi
FOR THE CABBAGE
- 400 g Green Cabbage
- 4 g Salt
- 4 g Sugar
- 20 g Rice wine vinegar
- 15 g Toasted sesame oil
- Black sesame seeds, Optional
TO FINISH
- Mayonnaise, Kewpie
- Tonkatsu sauce
- White bread, thick sliced
METHOD
FOR THE CABBAGE
- Add the thinly sliced cabbage to a mixing bowl and season with salt and sugar. For accurate seasoning weigh your cabbage and add 1% of the weight in salt and sugar. (I had 400g of cabbage so I added 4g salt and 4g sugar).
- Massage in the salt and sugar and allow to sit for 20 minutes.
- Squeeze out as much moisture as possible and place into a mixing bowl.
- Season with sesame oil, rice wine vinegar and sesame seeds (optional). Stir to combine and reserve.
FOR THE CHICKEN
- Prepare a breading station comprised of 3 plates or dishes, one filled with all-purpose flour, one filled with the eggs and the last with panko. Season each lightly with salt and togarashi. Beat the eggs until homogenous with a fork.
- Debone the chicken legs if your butcher hasn’t already.
- Lay each leg out flat onto a chopping board and cover with a sheet of cling film.
- Lightly hit the chicken leg with a frying pan or meat mallet to flatten it slightly so that it is of reasonably uniform thickness.
- Dredge the chicken through the flour, shaking off any excess. Repeat with the egg and panko breadcrumbs and set aside on a tray.
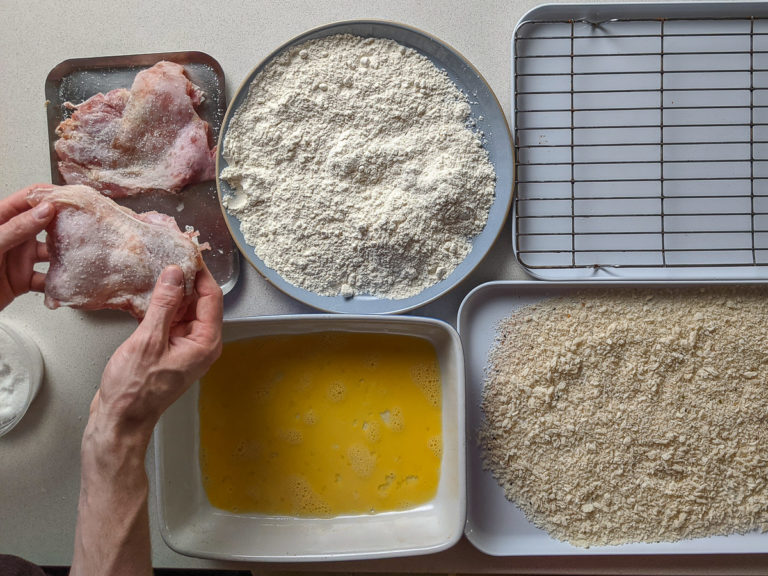
- When the chicken is all breaded, place a high sided frying pan over medium-high heat. Add vegetable oil to the pan until it is roughly 1cm deep. If you have a lot of chicken to cook, set the oven to 100C so you can hot hold it while you finish your cooking.4 Chicken legs
- Lay the chicken into the pan and cook for 2-3 minutes on each side. Make sure that the chicken isn’t crowding the pan and that there is enough oil to cover halfway up the chicken legs.
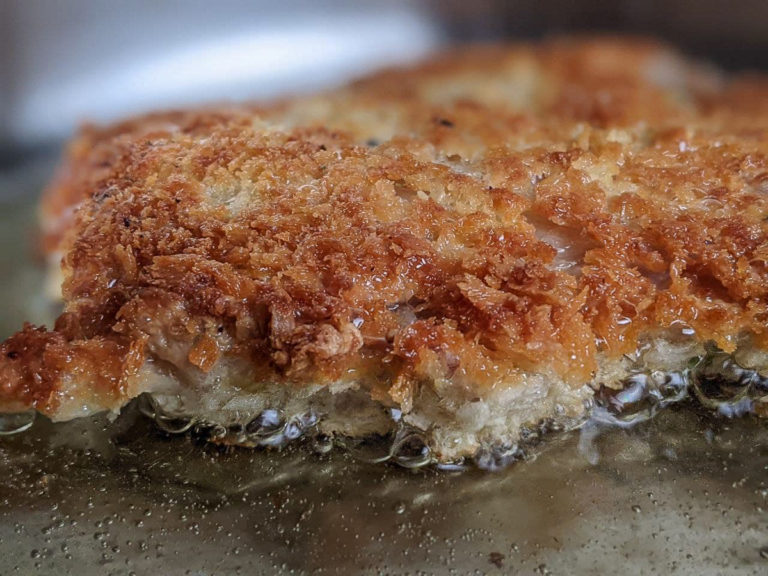
- Once the chicken is well-browned and cooked through, allow it to drain on paper towels and optionally place to hot hold in your 100C oven while you assemble the sandwiches.
SANDWICH ARCHITECTURE
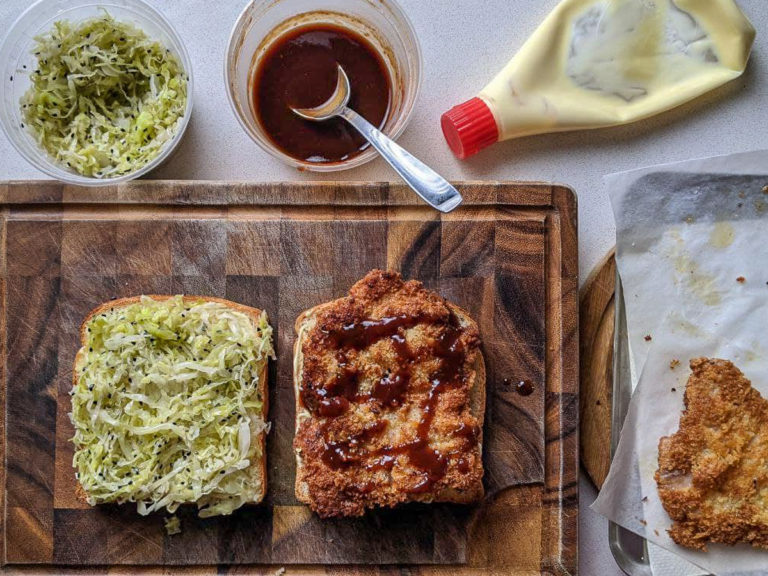
- Layout two thick slices of thick-sliced white bread and on the inside of each spread plenty of mayonnaise.
- Top one slice with a piece of fried chicken and drizzle with plenty of tonkatsu sauce.
- On the opposite slice place a nice even mound of the cabbage mixture and close to shut with the other slice of bread.
- Cut in half, stop to enjoy the cross-section and serve immediately.
PRO TIPS
Whenever I fry anything in batches, I always have my oven preheated to 100C with an empty tray inside so that my cooked items can stay nice and hot while everything elsze is finished cooking.